Joomla! 3
Joomla! 3
-
How to install in Joomla!
How to install Template Creator CK in Joomla!
The easiest way to install Template Creator CK is to use the install with the ZIP file. In some cases this method does not work, essentially because your server does not allow the file to be uploaded. You can then use the method to install from a folder.
Method 1 : Upload package file
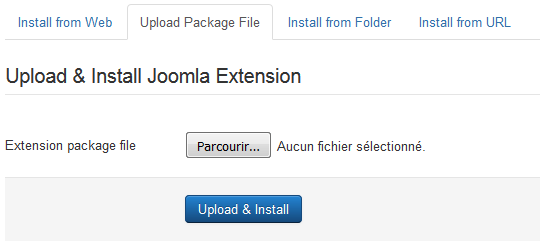
Go in the admin menu >> Extensions >> Install, and selec the tab Upload Package File

You can select the file that you have downloaded on https://www.template-creator.com which shall have a name like this : com_templateck_X.X.X.zip
Once you have selected this file, you can click on the Upload and Install button.
The main cause of this method to not work is when you are using a server which has an upload file size limit at 2 Mo. This is typically the case of the local servers like Wampserver.
To avoid this problem you can simply change this limit in your server. Go in your Wampserver folder to find the php.ini file, for example in
C:\wamp\bin\apache\apache2.2.x\bin\php.ini
Edit the file (notepad++ is a simple and useful tool to do that) and search for the line
upload_max_filesize = 2M
replace the value for something higher, like this
upload_max_filesize = 8M
Then save the php.ini file, restart your server and try again to install the file.
Method 2 : Install from folder
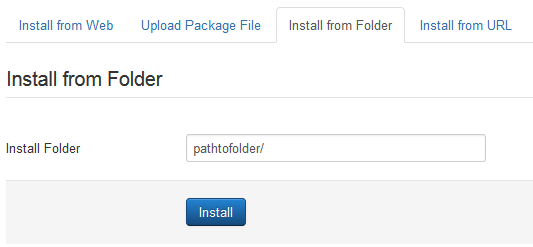
You can use this method if the one described above does not work. Go in the admin menu >> Extensions >> Install, and select the tab Install from folder

You must first unzip the file com_templateck_X.X.X.zip
This will give you a folder with a .xml file and other files : this is the main component extension.
Once extracted, you should see some folders and files, and the most important is to see the .xml file (needed for installation).

You can now copy/paste the path to this folder in the Install folder field in your website and click on the Install button if you are working on a local host.
If you are using this method on a live server, you must upload your files on the server with FTP (or a file browser tool from your host provider). Then give the path to your server folder, where you have placed these files (where the .xml file is located) and click on the Install button.
-
How to remove a template
How to remove a template
When you delete a template from Template Creator CK, it will not remove it from your Joomla website. This is made to avoid your template to be removed accidentally.
So if you want to remove a template, you must remove the files manually. There are 2 methods
- using the Joomla installer
- using FTP
1/ Using the Joomla installer
Go in your
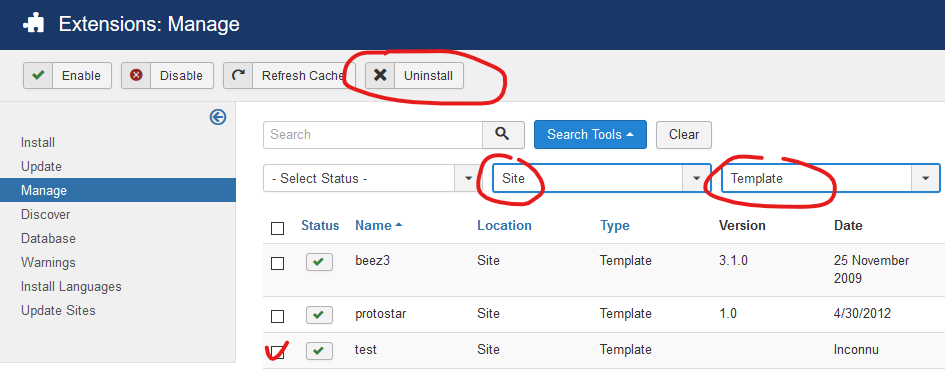
admin menu >> Extensions >> Manage >> ManageYou can filter by type =
template, folder =site, so that you can see all the frontend templatesThen you can select your template and click on the
Uninstallbutton
NOTE
If you don't find your template in the list, then it means that your template has not been installed in Joomla, even if the files are preset. You can install it manually so that you can remove it, directly from the backend interface
to install the template files : Go in
admin menu >> Extensions >> Manage >> DiscoverClick on the
Discoverbutton to check for the existing files that are not yet installed in the system. You can select the template and click on theInstallbutton. Then you can start again the method to uninstall it from the Joomla installer.2/ Using FTP
You can connect to your FTP client and go in the
templatesfolderYOUR_SITE/templates
here you will find all the templates that are in your website. You can remove them by deleting the folder.
NOTE that some templates may be installed into your website, it is recommended to check in the Joomla templates list what you are currently using, because this action can not be reverted
-
How to update in Joomla!
How to update in Joomla!
In Joomla! the update process is simple.
Download the latest version of Template Creator CK
Go in your website admin >> Manage >> Install >> Select the .zip file that you have downloaded
Joomla! will automatically update the files for the existingi installation.
-
Templates list in Joomla!
Templates list in Joomla!
When you are in the Template Creator admin page, you can see the templates list.
1/ Toolbar
You can find here all actions to perform in the component, to create a new template, edit it (edit the informations like the name, date, author ..).
Export a gabarit : What is a gabarit ? it is a file that contains all the template informations so that you can save it into a format that you can import into Template Creator. Export the gabarit and you will generate a file .TCK3Z.
This is very useful to share or save the template.
Import a gabarit :Import the TCK3Z file so that you can retrieve the template structure with all modules and styles, also the images and the custom css.
2/ Left menu
Here you can go to each page :
Templates list : The list of all your templates to manage
Fonts : you can add some Fontsquirrel here, so that you can select them directly into your template edition interface
Note that you can directly manage the Google fonts in the template interface
About : it gives you the information about the software version and the release notes
Help : it shows some videos to help you in managing some tasks, like editing the custom.css file
3/ Templates list
You can see all your templates creation here. Click on the one you want to enter in the edition mode.
-
Welcome in the documentation
Welcome in the
Template Creator CK
documentation.
You will find here a lot of useful informations to help to you use the software, and also to help you to get the desired result to create your own Joomla! template, or Wordpress theme.
If you don't find what you are looking for, don't hesitate to use the contact form to submit your request.
Hope it helps !
CEd
-
Documentation
-
First steps
-
Interface
- Align the modules horizontally
- Overview in Joomla!
- Overview in Wordpress
- How to use Pixabay for your images
- Templates list in Joomla!
- Themes list in Wordpress
- Create a new theme / template
- Add / manage the blocks
- How to add the Google Analytics code
- Manage Google Fonts
- Add a FontSquirrel
- Expert mode
- Add some custom CSS
- Add some custom Code
- Import / Export a gabarit
- Color Palette
- Context menu
-
Layout
- How to make sticky menu, or sticky header
- How to enable the mobile menu
- CSS grid to use in your content
- Create a sidebar design
- Create a full width area
- Aligned modules layout
- Row VS Aligned modules
- Create a full screen header
- Maincontent layout
- Hide the maincontent
- Manage the columns
- Responsive design
-
Miscellaneous
- Create a dark mode for your template
- How to update your template for Joomla 4
- Overrides to check in Joomla 4
- Change the name of the theme / template
- CSS icon font VS SVG icons
- How to add a video as background
- How to create a splitted title
- Add custom images
- How to translate your sidebar names
- Manual library installation
- How to create a One page scrolling template
-
Options
-


